-
한번에 적용하는 Sentry with Next.jsReact.js & Next.js 2023. 10. 23. 20:05

들어가며
안녕하세요, 정말 오랜만에 기술 블로그로 돌아왔습니다! 약 3개월 동안 많은 일들이 있었습니다. 서비스 출시가 임박하기도 했고, 프로덕션 배포에 집중하느라 글 작성을 등한시했던 것 같습니다. 아무래도 반복되는 작업과 공유할 수 있는 양질의 글이나 주제를 선택하기가 어려웠었어서 방생 아닌 방생조치를 취하고 있었던 것 같습니다. 이번에 공유드릴 내용은 Sentry 입니다. 전체적으로 서비스에 Sentry를 적용하게 되면서 겪었던 문제점이 많았기 때문에 다른 프론트 개발자 분들이 보기 쉽게 공유차원에서 글을 작성했습니다. 하단에 레포지토리도 같이 달아두었으니, 전체적으로 글을 읽고 코드로 직접 보시면서 만들면 보다 쉽게 적용할 수 있을 것 같습니다. 질문은 언제나 환영입니다. 목차를 보고 천천히 따라가 보시면서 이해가 안 되는 부분이 있다면 언제든지 댓글 또는 이메일로 남겨주세요!
목차
- What is the sentry?
- Why should we use the sentry?
- How can we use the sentry?
- Improve the sentry
- connect sentry with slack notification
- References
1. What is the Sentry?
Sentry는 우리가 서비스를 제공하는 동안 발생하는 다양한 에러를 추적하고 모니터링할 수 있는 오픈 소스 오류 추적 도구입니다. Sentry를 사용하면 애플리케이션에서 발생한 에러를 실시간으로 모니터링하고, 이를 기반으로 문제를 신속하게 해결할 수 있습니다. 또한, Sentry는 에러의 발생 원인을 파악하고 사용자에게 더 나은 사용자 경험을 제공하기 위한 개선점을 도출하는 데에도 도움을 줍니다.
2. Why should we use the Sentry?
우리는 B2C 또는 B2B 서비스를 제공하면서 원하던 원치 않던지 간에 수많은 에러를 만나게 됩니다. 우리가 인지하고 있거나, 인지하지 않더라도 에러는 발생할 수 있습니다. 제가 속해있는 스타트업의 경우, 일이 매우 세분화되어 있다기보다는 한 사람이 다양한 일을 하는 경향이 있기 때문에, 완벽하진 않더라도 믿을 수 있는 혹은 믿고 잠잘 수 있는 서비스를 제공하는 것이 중요하다고 생각했습니다. B2C 서비스를 제공하면서 문제가 발생했을 때, 사용자에게 직접 스크린샷을 요구하지 않더라도 시스템적인 에러라면 사전에 처리할 수 있을 것 같습니다.
3. How can we use the Sentry
sentry를 도입하면서 느낀 점은 단순 도입은 크게 어렵지 않다는 점입니다. 도입보다 중요한 것은 팀의 상황에 맞춰, 원하는 목적에 맞춰 고도화하는 것인 것 같습니다. 천천히 따라 해 보시고, 적용하시는 분들의 환경에 맞춰 고도화하시기를 추천드립니다!
1) 프로젝트에 센트리 도입하기
현재 저희 서비스는 next.js를 기반으로 sentry를 사용하고 있습니다. 해당 조건에 맞춰, sentry 사용법을 간단하게 만들어보도록 하겠습니다.
1. 프로젝트 초기화하기
$ npx create-next-app sentry-test-for-everyone --typescript2. 센트리 가입 이후, 사용할 플랫폼 설정하기
센트리를 가입하면, 어떤 플랫폼에서 센트리를 사용할 것인지 선택할 수 있습니다. 전제 조건이 next.js이기 때문에 next.js를 바탕으로 진행하도록 하겠습니다.
3. sentry wizard를 통해 프로젝트에 적용하기
초기화한 센트리 프로젝트에 해당 명령어를 입력합니다.
$ sentry-test-for-everyone git:(main) ✗ npx @sentry/wizard@latest -i nextjs

Need to install the following packages:

  @sentry/wizard@3.16.0

Ok to proceed? (y)
Running Sentry Wizard...
version: 3.16.0 | sentry-cli version: 1.75.2
Sentry Wizard will help you to configure your project
Thank you for using Sentry :)
Skipping connection to Sentry due files already patched

┌   Sentry Next.js Wizard
│
◇   ────────────────────────────────────────────────────────────────────────────────────────────────╮
│                                                                                                   │
│  The Sentry Next.js Wizard will help you set up Sentry for your application.                      │
│  Thank you for using Sentry :)                                                                    │
│                                                                                                   │
│  Version: 3.16.0                                                                                  │
│                                                                                                   │
│  This wizard sends telemetry data and crash reports to Sentry. This helps us improve the Wizard.  │
│  You can turn this off at any time by running sentry-wizard --disable-telemetry.                  │
│                                                                                                   │
├───────────────────────────────────────────────────────────────────────────────────────────────────╯
│
▲  You have uncommitted or untracked files in your repo:
│
│  - yarn.lock
│
│  The wizard will create and update files.
│
◇  Do you want to continue anyway?
│  Yes
│
◇  Are you using Sentry SaaS or self-hosted Sentry?
│  Sentry SaaS (sentry.io)
│
◇  Do you already have a Sentry account?
│  Yes
│
●  If the browser window didn't open automatically, please open the following link to log into Sentry:
│
│  <https://sentry.io/account/settings/wizard/**/>
│
◇  Login complete.
│
◇  Select your Sentry project.
│  test-**/javascript-nextjs
│
◇  Installed @sentry/nextjs with Yarn.
간단하게 소개하면 다음과 같습니다.
- Sentry를 SaaS(Software as a Service)로 사용할 것을 등록합니다
- 센트리를 회원가입 했기 때문에 Sentry account를 사용하여 로그인합니다
- Yarn을 통해 센트리(@sentry/nextjs) 를 다운로드합니다.
2) 변경/ 추가된 파일
wizard 명령어를 통해 초기화만 하신다면 만나게 될 변경 및 추가된 파일입니다. 직접 확인해 보실 수 있기 때문에 해당 파일들을 모두 공유하진 않겠습니다.
- pages/sentry-example-page.jsx : sentry의 예제 코드가 들어간 페이지입니다
- .sentryclirc: 센트리를 cli (command line interface)로 사용하기 위한 토큰이 들어있는 파일입니다
- next.config.js: 센트리를 사용하기 위하 모듈을 withSentryConfig로 감싸게 됩니다.
- package.json: 최신 버전의 @sentry/nextjs를 다운받게 됩니다
- sentry.client.config.ts / sentry.edge.config.ts / sentry.server.config.ts: 서버를 켤 때마다 센트리를 사용하기 위한 초기 세팅들이 들어있습니다.
3) 에러 발생시키기
pages/sentry-example-page 로 접근하여 에러를 직접 발생시켜 봅니다.

다음과 같은 뷰에서 Throw error! 버튼을 클릭하면 에러가 발생하게 됩니다. 실제 제가 사용하는 전략 상에서는 필요한 특정 메서드들만 사용하지만, 기본적으로 제공하는 코드에 대해서도 간단하게 살펴봅니다.
<button type="button" style={{ padding: "12px", cursor: "pointer", backgroundColor: "#AD6CAA", borderRadius: "4px", border: "none", color: "white", fontSize: "14px", margin: "18px", }} onClick={async () => { const transaction = Sentry.startTransaction({ name: "Example Frontend Transaction", }); Sentry.configureScope((scope) => { scope.setSpan(transaction); }); try { const res = await fetch("/api/sentry-example-api"); if (!res.ok) { throw new Error("Sentry Example Frontend Error"); } } finally { transaction.finish(); } }} > Throw error! </button>Transactions can be accessed and created separately if you need more control over your timing data or if you use a version of the SDK that doesn't support the top-level span APIs.
onClick 메서드 내부에 transaction 을 설정합니다. 센트리에서 제공하는 개념으로, 네가 원하는 데이터를 원하는 타이밍에 관측을 하겠다는 의미로 사용됩니다.
해당 트랜잭션이 만료될 때까지(종료할 때까지) 개념에 대한 스코프를 설정합니다.
const transaction = Sentry.startTransaction({
  name: "Example Frontend Transaction",
});
transaction이라는 변수에 ‘Example Frontend Transaction‘ 이라는 객체를 담았습니다. configureScope에 span을 설정할 경우, 센트리 이슈창에서 다음과 같이 확인할 수 있습니다.

3. try catch finally
try { const res = await fetch("/api/sentry-example-api"); if (!res.ok) { throw new Error("Sentry Example Frontend Error"); } } finally { transaction.finish(); }- fetch 메서드를 통해 특정 경로에 api를 요청합니다.
- res.ok가 falsy 할 경우 에러를 발생시킵니다.
- try, catch가 끝나면 transaction을 종료합니다.
위와 같은 흐름으로 버튼을 클릭하면 우리는 센트리에 알림을 받게 됩니다.

전체적으로 확인을 한다고 하면 우리는 다음과 같은 주요 정보를 알 수 있습니다.
- 어떤 IP에서 요청을 보냈는지?
- 어떤 브라우저의 어떤 버전을 사용하고 있는지?
- 어떤 디바이스를 사용하고 있는지?
- 어떤 환경(development, production)에서 발생한 이슈인지?
- 어떤 레벨의 이슈인지?
- 핸들링된 에러인지 핸들링되지 않은 에러인지? (런타임 에러 유무)
또한, integrations을 통해 추가적인 플러그인들을 지원합니다.
4. Improve the Sentry
예제를 따라갔던 위와 같은 흐름에서는 선언적으로 모든 에러에 대해 직접 어떤 에러인지를 정의하고 필요한 정보를 넣어줘야 합니다.
제가 센트리를 사용하는 주된 목적은 api 호출에 대해 사용자가 일반적이지 않은 응답을 받았을 때 이를 로깅하기 위함입니다. 따라서 저는 api의 request와 response에 대해 에러(Error) 객체를 상속받아 필요한 커스텀 에러 핸들링 클래스를 만들고 이를 센트리에 보내 관측하는 작업을 진행해 보겠습니다.
4.1) Axios 에러 클래스 추상화하기
axios를 통해 api 요청을 핸들링한다고 가정해 보겠습니다. api 요청 시, 원하는 정보(추상화된 정보)를 센트리에 보내기 위해 AxiosError 객체를 만들어 보도록 하겠습니다.
$ yarn add axios🗂️ utils/exceptions/apiError.ts
- getErrorName을 통해 내부에서 error 이름을 정의합니다
- 레코드 구조를 사용하여, 가독성을 높였습니다
- axios의 정적 메서드인 isAxiosError를 통해 AxiosError인 객체에서 필요한 필드를 추상화하는 클래스입니다.
- ApiError의 abstractAxiosError (정적 메서드)를 통해 호출부에서 추상화된 객체에 접근할 수 있습니다
- 추상화된 필드를 Sentry 메서드의 조건에 추가하여 필요한 정보들을 Sentry에 로깅할 수 있습니다.
export class ApiError extends Error {
  public name: string;
  public statusCode: number;
  public responseData: any;
  public url?: string;
  public method?: string;
  public params?: any;

  constructor(message: string, statusCode: number) {
    super(message);
    this.statusCode = statusCode;
    this.name = this.getErrorName(this.statusCode);
  }

  private errorMap: Record<number, string> = {
    400: 'Bad Request',
    401: 'Unauthorized',
    403: 'Forbidden',
    404: 'Not Found',
    405: 'Method Not Allowed',
    408: 'Request Timeout',
    500: 'Internal Server Error',
    502: 'Bad Gateway',
    503: 'Service Unavailable',
  };

  private getErrorName(status: number): string {
    return this.errorMap[status] || `[${status}] Api Error - Unhandled Status Code`;
  }

  /**
   * @description
   * AxiosError에서 필요한 정보를 추출하여 ApiError로 변환합니다.
   */
  public static abstractAxiosError(axiosError: AxiosError): ApiError {
    const errorMessage = (axiosError.response?.data as any)?.message || axiosError.message;
    const statusCode = axiosError.response?.status || 999;

    const apiError = new ApiError(errorMessage, statusCode);
    apiError.responseData = axiosError.response?.data || null;
    apiError.url = axiosError.config?.url || '';
    apiError.method = axiosError.config?.method || '';
    apiError.params = axiosError.config?.params || {};

    return apiError;
  }
}
🗂️ utils/exceptions/checkAxiosError.ts
- 에러가 발생했을 때 어떤 에러인지 캐치합니다
- axios 에러만 캐치하고 있기 때문에 fetch, XMLHttpRequest의 에러는 캐치하기 어렵습니다
- axios가 아닌 에러의 경우 global 메서드로 보내주고 필요한 정보를 바인딩하여 Sentry로 보냅니다
export const checkAxiosError = (e: unknown) => {
  if (axios.isAxiosError(e)) {
    const apiError = ApiError.abstractAxiosError(e);
    sentryHandler.api(apiError);
  } else {
    const error = e as Error;
    sentryHandler.global(error);
  }
};
🗂️ utils/exceptions/checkAxiosError.ts
- Sentry에 보내게 될 필드들을 정의합니다
- axiosResponse, axiosRequest에 들어있는 프로퍼티 명과 맞춰주었습니다.
const api = (error: ApiError) => {
  Sentry.withScope((scope) => {
    scope.setLevel('fatal');

    Sentry.setContext('🔥 API Request Detail 🔥', {
      name: error.name,
      statusCode: error.statusCode,
      responseData: error.responseData,
      url: error.url,
      method: error.method,
      params: error.params,
    });

    Sentry.captureException(error);
  });
};

const global = (error: Error) => {
  const time = new Date();

  Sentry.withScope((scope) => {
    scope.setLevel('info');

    Sentry.setContext('🔥 Global Error Detail 🔥', {
      ...error,
      time: dateToLocalDateString(time),
    });

    Sentry.captureException(error);
  });
};

export const sentryHandler = {
  api,
  global,
};
🗂️ utils/dateToLocaleDateString.ts
- 언제 발생한 에러인지를 추가로 보내주기 위해서 작성한 유틸함수입니다.
export const dateToLocalDateString = (date: Date) => {
  const dateObj = new Date(date);

  const options: Intl.DateTimeFormatOptions = {
    year: 'numeric',
    month: 'long',
    day: 'numeric',
    hour: 'numeric',
    minute: 'numeric',
  };

  const formattedDate = dateObj.toLocaleDateString('en-US', options);

  return formattedDate;
};
4.2) 센트리의 메서드 입맛에 따라 사용하기
센트리에서는 다양한 메서드를 제공하고 있습니다. 이 중 처음 도입하는 과정에서 제가 흥미를 느꼈던, 필요하다고 느꼈던 개념에 대해서만 가볍게 설명하고 사용해 보도록 하겠습니다.
4.2.1) Sentry.withScope
하나의 호출 안에서도 스코프를 사용하여 데이터를 pushing 및 configuring 할 수 있습니다.
Sentry.withScope(function (scope) {
  scope.setTag("my-tag", "my value");
  scope.setLevel("warning");
  // will be tagged with my-tag="my value"
  Sentry.captureException(new Error("my error"));
});

// will not be tagged with my-tag
Sentry.captureException(new Error("my other error"));
4.2.2) Sentry.setContext
커스텀 데이터를 쌓기 위한 가장 좋은 방법은 context를 쌓는 것입니다. setContext에 객체 구조로 데이터를 바인딩할 수 있습니다.
Sentry.setContext("character", {
  name: "Mighty Fighter",
  age: 19,
  attack_type: "melee",
});
4.2.3) Sentry.captureException
일부 컨텍스트 데이터는 ‘captureException’과 ‘captureMessage’ 메서드를 호출하여 즉각적으로 제공될 수 있습니다. 제공된 데이터는 현재 스코프 안에 이미 들어있는 데이터와 병합되어 보내집니다.
이 함수는 3가지 방식으로 동작합니다.
- Plain object containing updatable attributes
- Scope instance from which we will extract the attributes
- Callback function that will receive the current scope as an argument and allow for modifications
Sentry.captureException(new Error("clean as never"), (scope) => {
  scope.clear();
  scope.setTag("clean", "slate");
  return scope;
});
4.3) 우리의 전략 적용하기
제가 사용한 전략은 다음과 같습니다.
- 한 가지 요청에 대한 로컬 스코프 설정하기
- 에러들에 대한 level 설정하기
- custom context 바인딩하기
- 에러 즉시 보내기
const api = (error: ApiError) => {
  Sentry.withScope((scope) => {
    scope.setLevel('fatal');

    Sentry.setContext('🔥 API Request Detail 🔥', {
      name: error.name,
      statusCode: error.statusCode,
      responseData: error.responseData,
      url: error.url,
      method: error.method,
      params: error.params,
    });

    Sentry.captureException(error);
  });
};
4.4) 에러 확인하기
앞서 보여드렸던 프로젝트에 정리한 전략을 적용해 보겠습니다.
🗂️ src/api/config.ts
const axiosConfig: AxiosRequestConfig = {
  baseURL: process.env.NEXT_PUBLIC_API_URL || '',
  withCredentials: true,
  timeout: 3000,
  timeoutErrorMessage: 'timeout 💣',
};

export const defaultAxios = axios.create(axiosConfig);
🗂️ src/pages/sentry-example-page
export default function Page() {
  const onclick = async () => {
    const transaction = Sentry.startTransaction({
      name: 'Example Frontend Transaction',
    });

    Sentry.configureScope((scope) => {
      scope.setSpan(transaction);
    });

    try {
      const res = await defaultAxios.get('/api/sentry-example-api');
      console.log('-- response is:', res);
    } finally {
      transaction.finish();
    }
  };

  const customErrorHandler = async () => {
    try {
      const res = await defaultAxios.get('/api/sentry-example-api');
      console.log('-- response is:', res);
    } catch (error) {
      console.error('-- error occurred in customErrorHandler:', error);
      checkAxiosError(error);
    }
  };

  return (
    <div>
				...
        <button
          type='button'
          style={{
            ...
          }}
          onClick={onclick}
        >
          Throw error!
        </button>

        <button
          type='button'
          style={{
            ...
          }}
          onClick={customErrorHandler}
        >
          Custom error throwing!
        </button>

        ...
    </div>
  );
}
4.4.1) 이슈 목록

4.4.2) 설정한 컨텍스트가 들어있는 모습

5. Connect Sentry with slack notification
슬랙 채널과 Sentry를 연결하여, 에러가 발생했을 때 슬랙에서 알림을 받는 방법을 소개해보도록 하겠습니다.
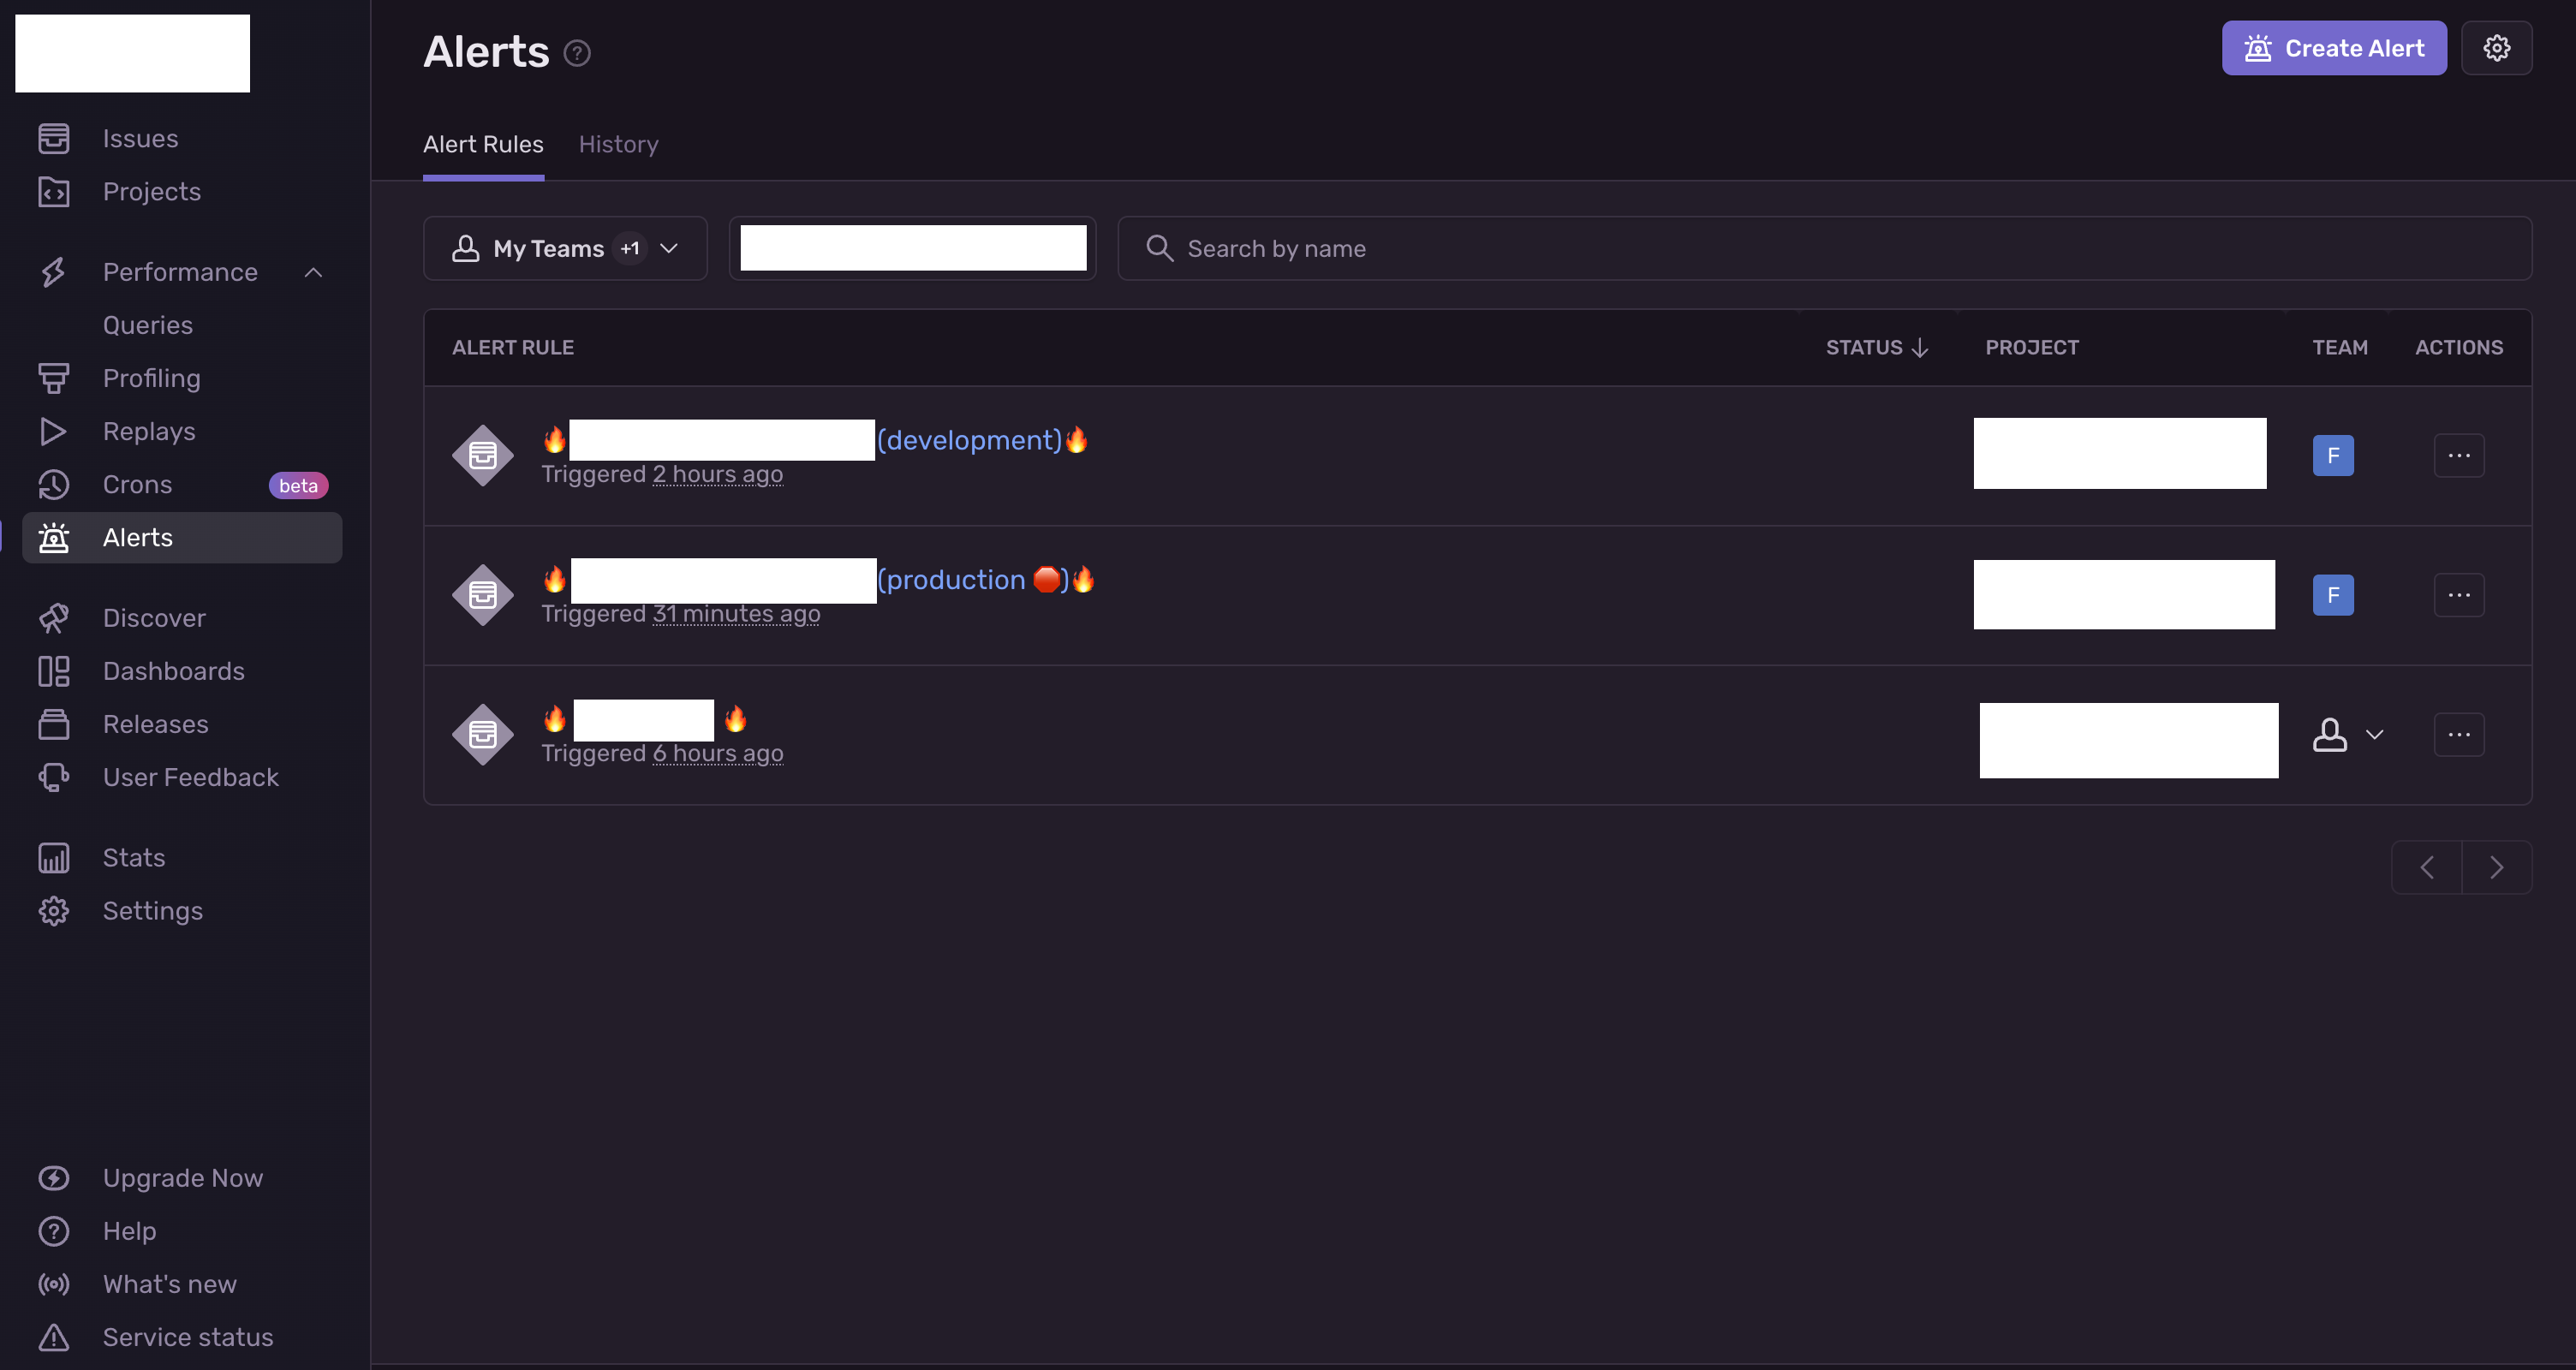
위 사진은 한 프로젝트 내에 알림을 3개로 나눠 놓은 사진입니다.
- A (development)
- B (production)
- C (the other team)
A 알림의 경우, development 환경에서 발생하는 에러에 대한 알림을 띄웁니다. 실제 서비스를 준비 중이지만, 아직까지는 개발 단계이기 때문에, 의도치 않은 에러를 만났을 때 빠르게 확인하기 위함입니다.
B 알림의 경우, 개발 중인 production 서버에서 발생하는 알림을 띄웁니다. Sentry 프로젝트를 initialize 할 때, 개발 환경(development, production)에 따라 알림을 다르게 받을 수 있기 때문에 후에는 production에서만 알림을 받기 위해 분기를 태웠습니다.
C 알림의 경우, 저희 서비스에 의존하고 있는 타 팀의 기능에 대한 알림입니다. 커스텀 에러를 따로 처리하고 있기 때문에 에러의 이름에 따라 알림을 슬랙의 다른 채널에 보낼 수 있습니다.
5.1) 알림 설정하기 🚨
1. When (when we make the notification)
- 언제 알림을 줄 건지에 대한 설정을 할 수 있습니다.
- 새로운 이슈가 생겼을 때, 이슈가 추가로 발생하여 resolved(해결됨) 상태에서 unresolved(해결되지 않음) 상태로 변경됐을 때
- 이슈가 archived(보관됨) 상태에서 escalating (고조됨) 상태로 변경됐을 때
상황 및 전략에 따라 다르겠지만, 알림 조건을 ‘기본적인 새로운 이슈가 생겼을 때’로 두겠습니다.

2. If (add condition for invoking issue notification)
IF 조건문은 필수가 아닙니다. 하지만, 채널에 따라서 알림을 다르게 주고 싶다면, 여기서 if 조건문을 설정해줘야 합니다. IF 조건문에는 all (모두 포함하는 경우), any (일부만 해당하는 경우), none (아무것도 해당되지 않는 경우)로 필터링을 할 수 있습니다.

예를 들어 메세지에 “value 값이 ‘WebError’를 포함할 경우” 해당 알림을 띄울 수 있습니다.
추가적으로, IF 조건문에는 정말 다양한 조건을 넣어줄 수 있습니다. setTag 메서드를 사용하여 특정 태그가 들어있는 Sentry 메시지만 특정 채널로 보내는 것 또한 가능합니다.
Sentry.withScope((scope) => {
    scope.setTag('oops key', 'oops value')

    Sentry.captureException(error);
  });
예를 들어 에러를 발생시킬 때 key 값을 ‘oops key’, value 값을 ‘oops value’라고 가정합시다. 그렇다면 아래 이미지의 조건문을 참조하여 다음과 같은 조건일 때 알림을 발생시킬 수 있습니다.
The event’s tag match { oops key } { match } {oops value}스코프에 debug 레벨을 걸어줄 경우, 아래 이미지의 조건문을 참조하여 다음과 같은 조건일 때 알림을 발생시킬 수 있습니다.
Sentry.withScope((scope) => {
		scope.setLevel('debug');

    Sentry.captureException(error);
  });
The event's level is { match } { debug }
3. Then (how can we handle the error?)
다음과 같이 워크 스페이스에 존재하는 opened 상태인 슬랙 채널의 이름을 입력하면 ‘Send Test Notification’을 통해 테스트 알림을 보낼 수 있습니다.

해당 슬랙 채널에는 다음과 같은 알림이 뜹니다.

6. References
Sentry를 효과적으로 다루는 방법 | HOJUNIN
Sentry를 효과적으로 다루는 방법 | HOJUNIN
플랫폼 서비스를 이용하는 사용자들이 제일 짜증나는 상황이 장애상황이라면, 개발자들에게는 그 장애상황이 왜 발생했는지 모르는 상황일거에요. 마치 형사들이 사건의 실마리를 하나하나 찾
www.hojunin.com
Sentry로 우아하게 프론트엔드 에러 추적하기 | 카카오페이 기술 블로그
Sentry로 우아하게 프론트엔드 에러 추적하기 | 카카오페이 기술 블로그
Sentry를 통해 프론트엔드에서 발생하는 오류를 신속하게 탐지하고 정확한 원인을 파악하여 빠르게 대응하는 방법을 알아봅니다.
tech.kakaopay.com
Sentry를 이용한 에러 추적기, React의 선언적 에러 처리 / if(kakao)2022
7. Repository
https://github.com/dlwnsgml0328/sentry-for-everyone
GitHub - dlwnsgml0328/sentry-for-everyone
Contribute to dlwnsgml0328/sentry-for-everyone development by creating an account on GitHub.
github.com
마치며
'React.js & Next.js' 카테고리의 다른 글
프론트엔드 테스트 코드 시작하기 - 개념편 (0) 2024.03.26 prettier로 import module 순서 통일하기 (0) 2023.10.24 구글 애널리틱스 (GA4) for developers (3) 2023.07.16 리액트에서 다중의 동적 폼 처리하기 (0) 2023.06.15 다양한 파일 확장자 파일 미리보기 지원하기 (0) 2023.04.05
